Trail Studio Photo Printing & Framing Service – FAQ
Trail Studio Photo Printing & Framing Service – FAQ (About the printing-file)
1. What should I pay attention to, when choosing a file for printing?
2. How to know if a file has sufficient resolution for a particular print-size?
3. What is image aspect-ratio?
5. Is the color of the print accurate, or same as what I see from my monitor?
1. What should I pay attention to, when choosing a file for printing?
a. Image resolution have to be sufficient (recommend at least 72dpi, higher is always better.
b. Print & file aspect-ratio must be the same otherwise the file has to be cropped to fit the print aspect-ratio. We will not crop the file for you because we cannot decide the image composition for you.
c. Whether the subject is placed too close to the image-border (which is the bleeding area)
d. Whether any darkened dot (sensor-dust) appears, especially when small aperture was used.
e. Enlarge the image to “100% crop” to check for defects, such as blurring, excessive noise or undesired facial expressions.
f. Check if the horizon is crooked.
g. If you use a mobile phone to email a photo, check if the email app is set to automatically down-size the photo, which is normally good because it saves mobile data, but bad for printing. Photos received via whatsapp will likely downsized as well (to prevent this from happening in whatsapp, the sender need to select the file via “document” rather than “gallery”).
2. How to know if a file has sufficient resolution for a particular print-size?
First of all, English inch is the traditional and most used measuring-unit in serious photograph-printing, those use CM in the first place are likely poster/ signage printers, at least this is the situation of Hong Kong. Poster/ signage printers offer photo papers & canvases as well but those are not the same thing offered by true photography/ fine art printers, the difference is just like bottom-shelf blended whisky vs single-malt whisky with age statement, both are whisky but they are of very different quality.
We sometimes receive questions like: “I use iphone to take a picture or my file is 4000x3000px etc, what size should I print?” Sorry but we can’t provide any suggestion about print-size because it’s mostly customer’s own preference. And we can’t tell the maximum printable resolution without checking the actual file, as whether a file is printable at good quality depends on a lot of factors, not resolution-reading alone.
But here’s some basic knowledge about resolution. Unit of resolution is dpi(ppi) – dot(pixel) per inch. It can be calculated by dividing one side of the file(in pixel) by the same side of the print-size(in inch). E.g., if the length of your file is 2160px, and if you want to print it at 30”, 2160/30=72dpi print-resolution.
While 72dpi is our recommended resolution bottom-line (because it’s still considered ok for many people), higher resolution is always better, and it’s normally quite good to use 150dpi when printing large photos, use again 2160px as an example, 2160px/150 dpi=14.4″ print size.
If you’d like to check how large a file can be printed in Photoshop, you can use the “Image-Size” dialog box, but make sure input the correct document-size WHILE keeping the original pixel-dimension, otherwise the print size will be inaccurate, a lot of people made this mistake.
As a wall decoration, if there has to be a trade-off between large size and high resolution, the size proportion between the photo and the wall is of higher priority because it affects the overall presentation/aesthetics more, as long as resolution is still acceptable at more than 72dpi, again higher is always better, and it may be much safer to use 150dpi.
If an image has been digitally enlarged or taken with digital zoom, the resolution-reading is a false one and the image will likely not as sharp at pixel-level. A high-res image may also be blurry if there was camera-shake, subject out-of-focus, and poor lens performance etc.
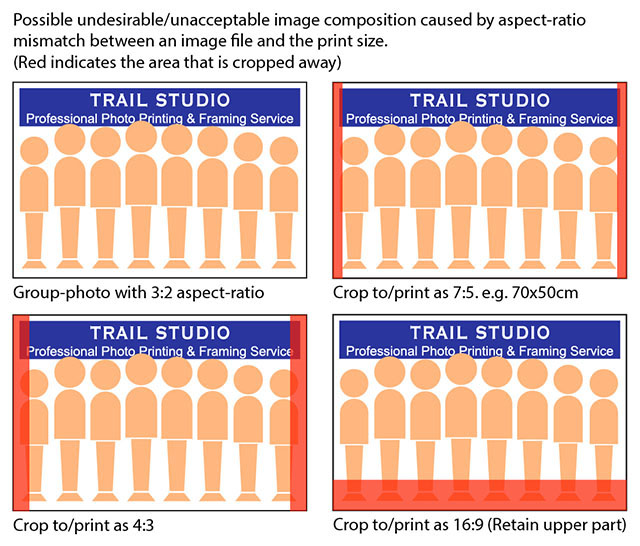
3. What is image aspect-ratio?
Image aspect-ratio is length:height proportion of the image. It is 3:2 for 135-format, APS-C cameras; 4:3 for 120-format, 4/3 and most smartphone cameras.
Besides using image-editing app, it can be calculated by dividing the long-side by short side of an image, here’re the results for common aspect-ratios:
1.5=3:2; 1.33=4:3; 1=1:1; 1.78=16:9; 2=2:1
Print & file aspect-ratio must be the same otherwise the file has to be cropped to fit the print aspect-ratio. We will not crop the file for you because we cannot decide the subjective image composition for you, and in many cases the image is “uncroppable” because of the resulting weird or unacceptable image composition .
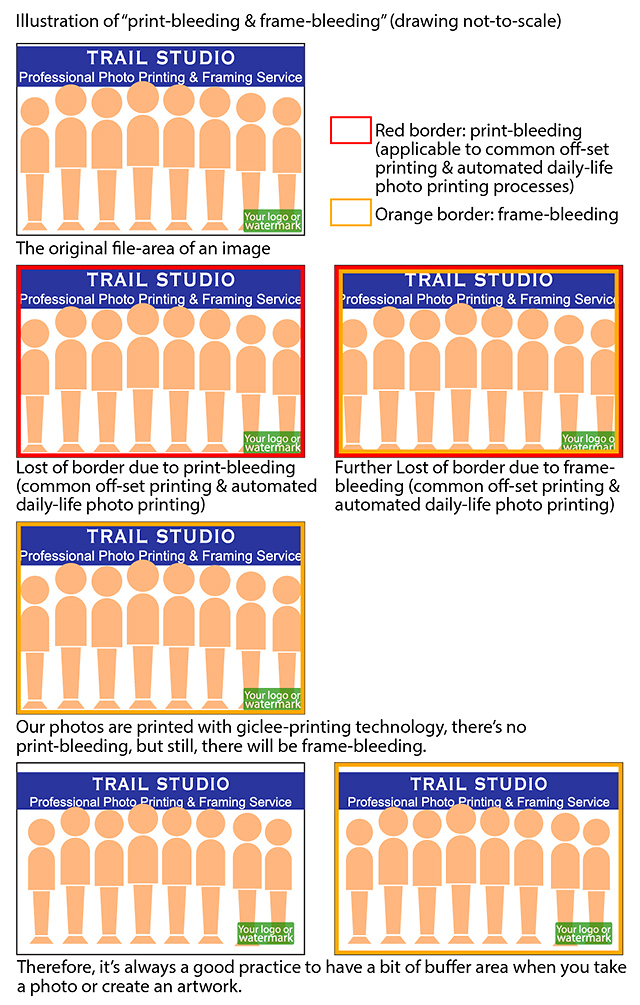
4. What is bleeding-area?
Print-bleeding commonly exists in off-set printing and standard automated daily-life photo printing, but it is not required in our professional giclee-printing process.
While print-bleeding is not required in our giclee-printing process, when a photo print is getting framed, image-border will be lost/not viewable because they are either trimmed away (for some frameless-style products), covered by the frame rabbet or passe-partout etc. This trimmed or covered area is called the “bleeding area” (to be specific, frame-bleeding), simply-speaking the purpose is to tolerate the little bit of size and positioning inaccuracy caused by paper/component elasticity etc. If an important subject is positioned too close to the border, part of it may not be viewable after getting the print framed.
The viewable size of a framed image is usually smaller than the actual print-size, it’s a common mistake to measure the viewable-size of an old photo when people want to print a new one.
In some (but not all) cases (for example, when framing photo paper or fine art paper with passe-partout), if an important subject is at the bleeding area and there’s no way to change the photo composition, there’s a workaround: making the window on the passe-partout larger than the image on the printing-paper, so that the unprinted white border (at least approx. 0.5″ width to minimize any visual problem caused by potential component size and positioning inaccuracy) of the printing-paper is being displayed as well, but this usually involves additional charges, as the framing procedure becomes more complex & technical.
5. Is the color of the print accurate, or same as what I see from my monitor?
Giclee-printing is well-known for its wide color gamut and color accuracy. However we do not guarantee the color of the print is the same as what you see from your monitor.
Color-management is actually very complicated, oversimply-speaking, most monitors are not professionally color-calibrated (color-managed) and brightness/contrast can be adjusted freely (i.e. inaccurate because they’re not following a certain STANDARD), many (if not most) monitors are set at high brightness/contrast (factory setting or by the user) to make colors attractive, but this usually makes them inaccurately brighter than the color-accurate printouts.
Calibrating the monitor (by using advanced/manual settings of monitor calibrators to specify certain “print-standard”) can narrow down the color difference between it and a print-out, but you shouldn’t expect them to be absolutely the same (warning: if the calibrators operate in basic/full-auto mode, the calibrated monitor will still likely be too bright comparing to a print-out, since print-matching isn’t the primary concern of those users who will simply use full-auto mode). In reality colors from different media (or color-spaces) will never be the same, moreover monitor is light-emitting but a print-out isn’t, this can seriously affect the impression of brightness.
If we judge that the brightness of your image isn’t good enough, we will provide suggestions.